HomeClassesPrintsDVD's

Wednesday, September 22, 2010

decoupage trays


You can never have too many trays..to keep and to give as gifts. Here are some tray ideas you might  like. For the black and white chicken print tray, I reduced the black and white chicken print to fit the tray. I photo-copied the black and white checked fabric I had left over from doing my office. Used it along with different borders to design the tray. This is my favorite..it's sassy

The wine tray was painted white on the inside.. the outside painted black. The edges were painted in a silver metallic paint. The border and toile grape wine makers print  were sprayed with spray shellac before I cut them out.
The Country French Tray. I photo-copied fabric I purchased in St. Remey Provence. The boy playing the flute is from my Country French Prints, I painted the outside and edges of the tray to match the red in the fabric.


Saturday, September 11, 2010

the decoupage garage group

Dubbed the "Decoupage Garage Group" by Donna (my studio is in our large garage)  we decided to celebrate with a luncheon during class on Thursday..didn't get much work done. First, the return of Denise from Italy, bearing gifts for each and everyone. Second, for Karen V. going to the Creative Conection Convention in the Twin Cites, Minnesota. The food was devine,,Rou brought her infamous broccoli salad, Karen brought chicken strips to go with it and wonderful fresh peaches, Donna brought strawberries with a cream cheese and something else in it as a dip. Brittany brought great cup cakes and her darling daughter just in time for lunch. I furnished the ice tea..ho ho. What a wonderful group this is..I teach them decoupage, they teach me friendship and love. Bless them all.

Wednesday, September 8, 2010

My Office

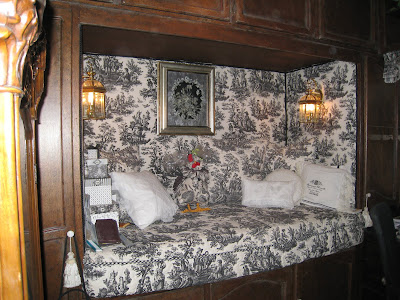
 Thought I would show you where I spend most of my time every day- my office. I did not need the closet space as much as I needed an alcove with a very comfortable chair. 

 The top of my desk was painted in black and white faux marble. All the woodwork was done by a former student..he did all the cabinets,book shelves and built in French cupboard bed (we had to bring all in through the double windows) Jack and I did the finishes.

We padded the walls around the built in bed (which is a twin bed by the way) Below are built in drawers and files to hold all my prints, notes for class etc.

Friday, September 3, 2010

A couple of decoupaged wastebaskets

I have been doing decoupage ever since Noah said we have landed on dry ground you can get off now, yet through all the years of teaching, cutting, pasting and designing, I realized the other day, I have been working harder not smarter. Case in point when designing the wastepaper basket I cut out this flimsy border I was going to use around the Country French figures. I had a heck of a time trying to hold the border in place...I had four different prints and ovals to glue on the wastebasket.. good grief !!!! Then the light bulb came on..get out the old trusty glue stick, glue your print to a a sheet of paper, glue your wreath around the print make a photo copy cut it out and voila it is done.
 Another idea for a wastepaper basket using the same idea of gluing the prints on a sheet of paper. I used orange shellac to age the prints and the trims around the flower prints. They were a series of flower of the month prints I got at the National Trust store in London. The border trim at the bottom and the top edge of the basket are trims I carry.
 Shown are all the paper pieces that I used on the black wastepaper basket. You can see how much easier it is to just cut out the assembled print. (remember, work smart... not hard. )